|
|
Replacing E04 Piston Cup Seals |
|
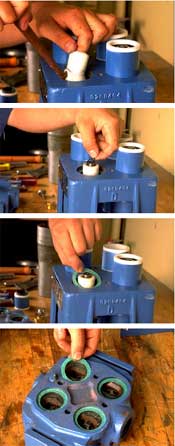
Step 1 The fluid chamber must be removed to provide access the piston cups. To remove the fluid chamber, first remove the four (4) hex bolts holding it to the power frame, then lift it off the top of the ceramic cylinders. Step 2 Each piston cup is held in place with a cap screw and piston retainer. Remove the cap screw and piston retainer from each of the four cylinders. Step 3 Lift each ceramic cylinder off from the top of the power frame. Friction will usually keep the piston inside the cylinder as it is removed. Once the cylinder and pistons are removed for each of the four cylinders, take them to a bench and push them out of the cylinder. Step 4 Inspect all o-rings, gaskets, seals, and other components for signs of damage or wear. Any damaged components should be replaced at this time. Inspect cylinder liners for cracks or grooves by running thumbnail around the bore of the cylinder and replace if any wear or damage is detected. New cups will wear quickly if operated in cylinders with rough or grooved bores. Note: to provide maximum operational time between service, FMC recommends that all four piston cups, not just the one that shows signs of leakage, be replaced whenever piston service is required. Step 5 The plastic umbrella shields keep any fluid that leaks past the piston cups from entering the power frame and contaminating the oil reservoir. Insure that the umbrella fluid shield is not damaged. If the umbrella requires replacement, the best way to remove it from the pump is to cut it free with a sharp knife. Step 6 To install new umbrella shields, fold the plastic as shown and insert through the opening and over the ends of the plunger rod. For easier installation of the umbrella, immerse in hot water for 2-3 minutes to soften. Press tops of umbrellas to place pilot washers over ends of plunger rods with groove in up position. Step 7 To rebuild, first place o-rings and packing holders in position on ends of plunger rod. Step 8 Place gasket and ceramic cylinder in counter bore of power frame. Step 9 Apply light oil or glycerin around the OD of the piston cups, then place them in the open (top) end of the cylinders. Use the thumb to press the cups down firmly into the holder of each cylinder. Step 10 Insert the cup retainers into the cylinders with the ribbed side facing the piston cup. Step 11 Secure piston assembly using cap screws. Torque as indicated in Fastener Torque Requirements section. Step 12 Insert top gasket (or o-ring and ring seal in some pump models) in fluid chamber counter bore using heavy oil or grease to hold in place. Step 13 Return fluid chamber to position over cylinders and insure that all seals are in place. Use a slight twisting motion on the fluid end to insure all cylinders are fully seated in fluid end counter bores.
Step 14 Replace fluid end cap screws. Torque cap screws in 3 stages to values shown in the Fastener Torque Requirements.
|
|